Blog

Candemonium Project

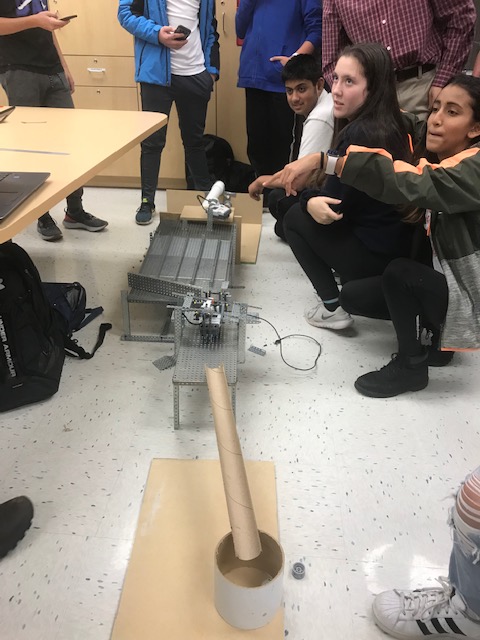
In class today, all the freshmen and sophomores teamed up into different groups to make a course that a golf ball needs to travel through and then drop the ball in a can. The ball had to go through certain level changes throughout the three stages. My group worked on part C of the project. It was a lot of fun and the second and third parts worked very well. The first one had some difficulties lifting the ball over the wall. next time doing this project I would probably spend more time discussing the design possibilities. To make our course better, we could have used a funnel to get the ball inside the can, instead of a ramp. The ball was to be lifted in part A, go down a ramp in part B, and then be catapulted in the can during part C. If we had more time, I think we could have improved much of the faults in our design.IMG_0904


First NXT Chellenge

In engineering my partner and I are building and coding an NXT bot to complete a challenge. The challenge is for the bot to pick a golf ball up from a stand, maneuver around a wooden obstacle, and then drop the ball in a bucket. My partner and I created a design for the bot and built it in class today. We are now working on the coding part of it. Hopefully we do not need to make to many adjustments to the bot and are able to complete the challenge by the deadline. I am very excited about this challenge and look forward to coding the NXT bot.


NXT Bot Design:

IMG_0760

NXT Bot:

IMG_0761

TEDTalk by Tony Wagner

In PLTW, we watched a TED Talk by Tony Wagner and it was very interesting. I agreed with what he thought were the best seven survival skills for the 21st century: critical thinking and problem solving, collaboration, agility and adaptability, initiative and entrepreneurship, effective oral and written communication, accessing and analyzing information, and curiosity. I also liked his play, passion, and purpose. I agree with him that kids should use their mind when they play as a kid, find a passion as they get older, and then use that passion to fix a problem in the world. Lastly, I learned that to create success, teachers and educators need to foster an environment of creativity and risk taking.

Hour of Code

Today I completed an Hour of Code with my brother. I taught him a little bit about an arduino and its components. I also showed him how to make an LED blink and also how to make it blink when pressing a button. I think he enjoyed learning a little bit about an arduino and how to use it. He wants to be in SELC, so it was good for him to get some experience using the amazing devise.

BoeBots

In class I worked with a BoeBot. It was very challenging, but I got much done. At first I started with just trying to get the bot to turn and go in a straight line. Later on I was able to set a distance and combine codes to get the BoeBot to go in a circle, square, and triangle. Using BoeBots was very interesting, a lot of fun to use, and I learned a lot from working with them.


Twitter

Today in class I created a Twitter account to add to my PLN. By using Twitter I can connect with people who are experts or are interested in STEM fields like me. This is a great tool to gain knowledge and provide knowledge to other people.

Follow me on Twitter here.

Pimp Your Pumpkin: An Arduino jack-o-lantern

In class we are working on the project Pimp Your Pumpkin. I bought a pumpkin and carved it. The next day I brought it to school and I started working on the arduino part of it. The main part of the project is to have LEDs inside the pumpkin and when somebody comes close the lights turn from yellow to red. I got through that part in one day of class and it took the entire period. My goal for the next class was to add a speaker so it also makes noise when somebody comes close and to make it look like the lights are flickering. The next day in class I was able to allow the arduino to create a noise when the red LED is lighting. This also took me the entire class period so I wasn’t able to make it look like the LEDs were flickering. I am happy with what I was able to get accomplished and I learned a lot about arduinos during this project.

Here is my code.

Here is my code for the Pimp Your Pumpkin LEDs and the buzzer.

Introduction to Arduino

In class we started working with arduinos. I learned some of the different parts of an arduino and some key parts to coding. I also learned about how LEDs can be used on a breadboard and light up in different patterns. Lastly, I learned how to code and use a Servo with an arduino. Right now coding is hard to understand for me, but as I kept on doing the different activities I got a little more familiar with it. I like the part of making LEDs light when you are actually putting the different components on the breadboard.  I enjoyed using the Servo because it is the first thing we added to an arduino that actually moves. At first I had to create different messages that would be displayed on the serial monitor. It was pretty easy because I was writing things like “Hello” and “Goodby” but as I progressed through the different activities it became a little harder. We had to make numbers pop up on the serial monitor in a certain order and stop at certain numbers. Then, I started to code the arduino so it lets LEDs light up. This was more fun, but also a lot more challenging. Lastly, I had to add the Servo to my arduino so it would spin in different directions and at different times. Overall I liked these activities and I think I will enjoy working with arduinos even though they are confusing for me right now.

My serial monitor activities:

My LED activities:

This slideshow requires JavaScript.

Servo activities:

Multiview Sketching

In class I worked on multiview sketching. A multiview sketch is the standard sketch format that engineers use to get across their point to professionals creating their product. In this type of sketch hidden lines are required because it helps the person looking at the sketch visualize the sketch better. A multiview sketch has the front of the object in the bottom-left, the top view of the object in the top-right, the right-side view, and an isometric pictorial of the object in the top-right. I liked creating multiview sketches because they give a lot of detail, and a person can clearly tell what the object looks like after viewing the sketches. I created six multiview sketches and I think they turned out pretty well.

Multiview sketches:

This slideshow requires JavaScript.

Isometric Sketching and Perspective Sketching

In class I learned what isometric sketching and perspective sketching are and how to create them. I have sketched my first isometric and perspective sketches which I think turned out pretty well. An isometric sketch lets a person view three views, the top, the front, and either the right or left side. Lines in a isometric sketch are parallel while in a perspective sketch they aren’t. A perspective sketch is drawn how you would actually see an object with your eyes. They can either be a one-point, two-point, or three-point sketch. A one-point perspective sketch has the width going to a vanishing point, with length and height staying straight. A two-point perspective sketch has the width and length going to their own vanishing point, with the height lines staying straight. Lastly, a three-point sketch has the length, width, and height all going to their own vanishing point. For me, drawing the perspective sketches were a lot harder than the isometric sketches. In the past we have been creating concept sketches which are only two dimensions. Creating an isometric and perspective sketches are more difficult than drawing a concept sketch. When creating an isometric and perspective sketch you need to the draw height, width, and depth compared to just drawing the height and width in a concept sketch. In addition, when drawing an isometric sketch orthographic paper is used, which I haven’t had any experience with. I drew a few isometric sketches that I replicated, a pencil, and a clothespin. I enjoyed this task because it was challenging and fun. I also drew a few perspective sketches that I replicated and a phone.

My Isometric Sketches:

My Perspective Sketches: